
Vein Maps & Shaft Texture: Realistic 3D Techniques Using Geology & Anatomy for Custom Toys
Yes, I'm not going to pretend this is a typical blog post. You're here because you've either tried to replicate your partner's anatomy in silicone and failed miserably, or you're about to start that journey and want to avoid the mistakes that cost me dozens of wasted casts. I've spent years designing toys for JockTribe, and before that, I ruined enough silicone batches to fill a storage unit trying to nail the perfect vein texture.
The thing is, understanding how veins actually form—both in geological contexts and on a human shaft—completely changed my approach to custom toy design. Most DIY guides skip this foundation, which is why your casts end up looking like smooth plastic dildos instead of the textured, gripping experience you're chasing.
Understanding Vein Formation and Shaft Morphology
When geologists talk about vein formation, they're describing how mineral-rich fluids migrate through rock fractures under pressure, crystallizing as they cool. The patterns they leave behind—those intricate networks and textures—aren't random. They follow structural stress lines, temperature gradients, and fluid dynamics.
Funny enough, penile vein textures follow similar principles. The dorsal vein, those lateral branches, the subtle tributaries near the corona—they're all responding to blood pressure, tissue elasticity, and the underlying erectile structure. When you're trying to map these onto a 3D model or cast, you're essentially reverse-engineering a hydraulic system.
Most people think veins are just raised lines on the surface. Wrong. They're three-dimensional structures with varying depths, widths, and branching angles. In geology, we'd call this vein morphology—the study of how these structures interact with their host material. On a shaft, that "host material" is skin, subcutaneous tissue, and the tunica albuginea underneath.
Here's where it gets practical: when I'm casting an athlete's anatomy, I'm not just looking at what's visible. I'm feeling for the pressure ridges, the subtle depressions where smaller vessels run, the asymmetry that makes each dick unique. Blocky texture in geology refers to equant crystal growth—think of those thick, pronounced veins that create distinct ridges. That's what you get on guys with lower body fat and prominent vascularity.
The synthetic equivalent requires understanding how silicone flows and cures. If you pour a basic two-part silicone over a lifecast without enhancement, surface tension smooths out 70% of the vein detail. You end up with what users accurately describe as "plastic-like" feel. Zero grip. Zero sensation variance during thrusting.

Controversy: Raised Vein Ridges vs. Subtle Realism in 3D Mapped Pleasure Devices
This debate splits the custom toy community right down the middle, and honestly, both sides are partially correct—which is the most frustrating thing about it.
The raised vein camp argues that prominent ridges create the drag and texture necessary for prostate stimulation or G-spot contact. One user I know celebrated his custom build with: "Finally mapped his thick dorsal vein—holy shit, the ridge hits my spot every thrust now, came hands-free twice." That's the goal, right? Functional anatomy that delivers targeted sensation.
But here's the reality check I learned after my first aggressive vein mapping attempt: "Tried sculpting his veins prominent like porn dicks, burned like hell after 5 min—back to barely-there lines." That quote comes from a forum regular who made the same mistake I did—assuming more texture equals better sensation.
The human rectum and vaginal canal don't have uniform nerve distribution. Too much texture, especially with fibrous texture patterns (those long, continuous ridges), creates friction hotspots. After 10-15 minutes of use, you're not feeling pleasure anymore—you're feeling raw irritation. I've tested this extensively, both on myself and through user feedback from JockTribe customers.
The subtle realism advocates aren't wrong either. They prioritize marathon sessions and comfort over intense initial stimulation. The trick is finding the middle ground, and that requires understanding what those veins are actually doing during penetration.
When a textured shaft enters, the veins create micro-variations in pressure distribution. It's not about height—it's about transition. A 1.5mm raised vein with gradual slopes on both sides provides sensation without chafing. A 3mm vein with sharp angles? That's a friction burn waiting to happen.
What nobody talks about enough is how lube interaction changes everything. Water-based lubes thin out faster, making aggressive vein textures feel harsher after 20 minutes. Silicone or hybrid lubes maintain cushioning longer, which is why I can get away with slightly more pronounced textures in my platinum-cure silicone builds.
The real failure point isn't choosing one approach over the other—it's ignoring the context of use. Are you making a quickie toy for intense, short sessions? Go with more pronounced syntaxial veins (those that grow outward from a central line symmetrically). Building something for extended edging or long-form play? Keep it subtle with barely-there ridges that suggest texture rather than dominating it.
Failed DIY Solutions: What Actually Ruins Vein Texture Realism?
Let's talk about the expensive mistakes that waste your time and materials.
Using basic silicone molds from life casting kits without vein enhancement is the most common failure mode. I see this constantly—someone buys a Clone-A-Willy kit, follows the instructions perfectly, and ends up with a disappointment. The complaint is always the same: "feels too uniform and plastic-like." Here's why: alginate captures surface detail beautifully at the moment of casting, but as it sets, surface tension in the liquid silicone you pour into that mold smooths out fine details. Those veins that looked perfect in the alginate negative? They're 40-60% less pronounced in the final silicone positive.
The fix requires intervening in that process. Before pouring your final silicone, I brush a thin layer of thickened silicone (Smooth-On's Thivex mixed into Part A works great) into the vein channels of the mold. This pre-filling ensures the details don't collapse during the main pour. It's an extra 20 minutes of work that makes the difference between "meh" and "holy shit that feels real."
Applying random vein stickers or paints to store-bought dildos is just... don't. I know it seems like a quick customization hack, but "textures peel off during use or lube application, leaving residue that irritates skin and ruins immersion" isn't an exaggeration. I've had users send me photos of partially delaminated vein appliqués that look like sad, flaking skin. Worse, the adhesives used in these products aren't designed for internal use. You're risking chemical irritation for zero actual benefit because painted-on texture doesn't create the depth variation your nerve endings respond to.
If you're determined to modify an existing toy, the only method I've seen work involves carefully scoring the surface with a Dremel and fine bit, then filling those grooves with color-matched silicone. It's tedious, requires steady hands, and honestly, you're better off starting from scratch with proper texture built into the mold.
3D scanning without manual vein sculpting in software produces what users accurately call "dead fish texture." Modern photogrammetry can capture overall shape beautifully, but fine surface details like veins get averaged out during mesh reconstruction. You end up with vague bumps that suggest something used to be there. I've worked with scans from $2000 structured light scanners, and even those require 2-3 hours of manual detail work in ZBrush to restore realistic vein definition.
The workflow that actually works: scan for base geometry, import into sculpting software, reference the original anatomy photos, and hand-sculpt every major vein using anatomy as your guide rather than trying to recover lost scan data. It's slower, but the result looks and feels like the real thing instead of a blurred approximation.
Comparative Table: Vein Texture Types in Geology vs. Custom Toys
| Geological Texture Type | Crystal Characteristics | Anatomical Analog | Tactile Impact in Toys | Manufacturing Notes |
|---|---|---|---|---|
| Fibrous texture | Elongated crystals perpendicular to vein walls; parallel alignment | Dorsal vein and major longitudinal vessels | Consistent directional drag; excellent for in-out motion; may cause friction during extended sessions | Best created with displacement mapping; requires gradual edge transitions (minimum 0.5 mm taper) |
| Blocky texture | Equant crystals; no preferred orientation; irregular spacing | Lateral vein network; corpus spongiosum surface vessels | Multi-directional sensation; feels organic; reduces pressure hotspots | Manual sculpting recommended; procedural generation often appears artificial; reference real anatomical photos |
| Elongate blocky texture | Partially stretched crystals; moderate directional preference | Diagonal wrapping veins; tension lines near the base | Good for grinding or circular motion; adds sensation variation without harshness | Angle veins at 25–40° relative to the shaft axis; optimal depth around 0.8–1.2 mm |
| Stretched crystals | Extreme elongation due to structural stress | Frenulum region vessels; corona rim detail | Concentrated sensation zones; enhances anatomical landmarks | Requires fine detail brushes; maintain minimum width of 0.3 mm to survive demolding |
| Syntaxial veins (medial suture) | Symmetric crystal growth from centerline outward | Primary dorsal vein with bilateral taper | Natural depth gradient; strongest sensation near center ridge | Model with ~1.5 mm center depth tapering to ~0.5 mm at edges across a 3–4 mm width |
| Antitaxial veins | Growth from walls inward toward the center | Rare in penile anatomy; occasionally appears in scar tissue patterns | Produces unusual sensation profile; generally avoided unless replicating specific anatomy | Difficult to mold; often leads to air-trap issues during casting |
| Crack-seal veins (banded) | Repeated fracture and healing cycles forming layered bands | Cross-hatched areas where multiple small vessels intersect | Subtle texture complexity; perceived as realistic without being aggressive | Layer multiple fine details (0.2–0.4 mm) instead of one coarse texture |
The siliceous halos you see around geological veins—where quartz or other minerals have altered the surrounding rock—have a direct parallel in color and texture gradients around prominent veins. In platinum-cure silicone, I replicate this by mixing slightly different pigment concentrations and carefully applying them in concentric zones during mold assembly. It's a 15-minute process that adds significant realism to the final product.
What this table doesn't capture is how these textures interact during use. A shaft with only fibrous texture (single dorsal vein) can feel monotonous. One with only blocky texture (random bump network) can feel chaotic and irritating. The sweet spot combines a prominent fibrous element (1-2 major veins) with supporting blocky networks (lateral detail) and strategic elongate blocky accents (diagonal wrapping near base). That's the recipe for toys that users describe as feeling "alive" during penetration.
Real vs. Ideal: Photographic Vein Maps or Artistic Sculpting?
Here's where personal philosophy intersects with practical outcomes. I've built toys both ways, and the debate is more nuanced than either camp admits.
The photo-accuracy obsessives argue that exact anatomical replication is the only path to authentic roleplay and partner-matching experiences. "Partner's shaft veins are asymmetrical AF, photo map revealed it—now my custom feels wrong if I symmetrize." That quote captures the core insight: real anatomy is never symmetric, and our brains are wired to detect that asymmetry as authentic.
I've done commission work where the client provided detailed reference photos from multiple angles, and I spent 8-10 hours meticulously replicating every vein branch, every asymmetric curve, every subtle texture variation. The result? The client reported it felt "exactly like having him inside me" during long-distance separation. That emotional resonance is powerful and completely valid.
But here's the counterargument from the artistic camp: real anatomy includes imperfections that don't enhance pleasure. Varicose areas. Scar tissue. Irregular pigmentation. Small vessel networks that create visual noise without adding functional texture. When you're creating a toy for repeated use, do you want to replicate the slight leftward curve that makes certain positions uncomfortable? Do you want to include the minor asymmetry that causes uneven pressure distribution?
The artistic approach takes anatomical reference as a starting point, then optimizes for pleasure response. This means slightly exaggerating the dorsal vein for better prostate contact. Smoothing out minor irregularities that would cause friction hotspots. Adjusting the angle of lateral veins to create more consistent sensation during rotation.
My personal approach splits the difference. I call it "enhanced realism"—I use photographic reference to capture the authentic vein network pattern and overall character, but I make subtle adjustments to optimize functionality. That might mean taking a slightly less prominent lateral vein and bringing it up to 0.8mm depth because I know from testing that it'll hit better during use. Or slightly regularizing the spacing of small vessels so they create rhythm rather than chaos.
The pitfall of over-idealizing anatomy is creating something that looks like a fantasy illustration rather than a real body part. I've seen custom toys that are "too perfect"—every vein symmetric, every curve mathematically precise, every texture element evenly spaced. They look impressive in product photos but feel artificial during use because your body knows that's not how organic tissue behaves.
The solution is understanding which imperfections to keep and which to optimize. Keep: asymmetric vein placement, irregular branching patterns, natural depth variation. Optimize: extreme curves that cause discomfort, texture elements that cause friction, proportions that don't match user anatomy.
Vein-Related Minerals & Alteration Halos (And Why Material Matters)
In geological veins, you typically find quartz, pyrite, anhydrite, and other minerals crystallizing from hydrothermal fluids. The surrounding rock often shows alteration halos—zones where chemical interaction has changed the host material's properties. This concept translates directly to material science in toy manufacturing.
When I'm selecting silicone for a vein-textured custom toy, I'm thinking about how the material will behave under stress in those textured areas. Platinum-cure silicone has virtually zero porosity—it's non-porous at the molecular level, which means bacteria can't colonize those vein ridges. This is critical for internal toys where hygiene isn't optional.
Tin-cure silicone (the cheaper alternative) has microporous structure. Those beautiful vein ridges you sculpted? They're now bacteria hotels. After 5-6 uses, even with thorough cleaning, you'll start getting that musty smell because microbial colonies are establishing themselves in the texture details. I learned this the expensive way with early prototypes that had to be destroyed after a month.
The alteration halos concept applies to how you integrate color into textured areas. If you're using opaque silicone, you can get away with uniform pigmentation. But translucent or semi-translucent silicone (which looks more realistic) requires thinking about light interaction. Real veins are slightly darker than surrounding tissue and have subtle color gradients in the immediate area.
I achieve this by mixing base silicone at one pigment concentration, then mixing a second batch at 1.5-2x concentration for the vein details. During mold assembly, I carefully inject the darker silicone into the vein channels first, then pour the base color. The result is veins that have natural color depth and subtle transition zones—those alteration halos—that make the whole thing read as organic tissue rather than colored plastic.
Pyrite in geological contexts is often associated with sulfur-rich environments. In toy materials, this reminds me to avoid any silicone additives that might off-gas or cause allergic reactions. Platinum-cure silicone cured with proper ratios is biologically inert, but if you're using pyrophyllite or talc as a thickening agent (common in some DIY formulations), you're introducing potential irritants. Not worth it for slightly easier processing.
The durability parallel is interesting too. Geological veins can be stronger or weaker than their host rock depending on mineral composition. In toys, vein ridges are stress concentration points. If your silicone is too soft (Shore 00-30), those ridges will tear over time. Too hard (Shore A-15+), and they'll feel uncomfortable. The sweet spot for textured toys is Shore A-5 to A-10—firm enough to maintain shape and provide sensation, soft enough to be comfortable during extended use.

FAQ: Your Actual Questions, Answered From Experience
How do I trace veins from a dick pic onto a 3D model without distorting the proportions when scaling up girth?
This is where most people screw up, and I did too for my first dozen attempts. The problem is that photos are 2D projections of 3D surfaces, and when you wrap that projection onto a cylinder of different dimensions, you get stretching distortion.
Here's my workflow: First, don't use a single photo. Take a series of photos around the full circumference at consistent distance—I use a ring light to eliminate shadows that fake depth. Import these into Meshroom or similar photogrammetry software to generate a base mesh. This gives you a 3D reference where vein positions are already in correct spatial relationship.
If you're scaling up girth, you can't just uniformly expand the mesh or your veins will stretch and look wrong. Instead, I use Blender's proportional editing to selectively scale the shaft diameter while keeping vein paths constrained. Think of it like this: the veins are roads on a map, and you're expanding the land area without making the roads longer—you're just increasing the space between them.
For manual tracing onto a primitive cylinder, use UV unwrapping to create a flat texture map, trace your veins onto that flat surface, then re-wrap it. But here's the critical part: measure the actual vein spacing in millimeters from your reference photos, then calculate how that spacing changes with your target circumference. If original circumference is 120mm and you're scaling to 140mm, your vein spacing needs to increase by 1.17x in the radial direction while maintaining longitudinal proportions.
Safe way to seal painted vein textures on TPE toys so they don't flake into my ass during long sessions?
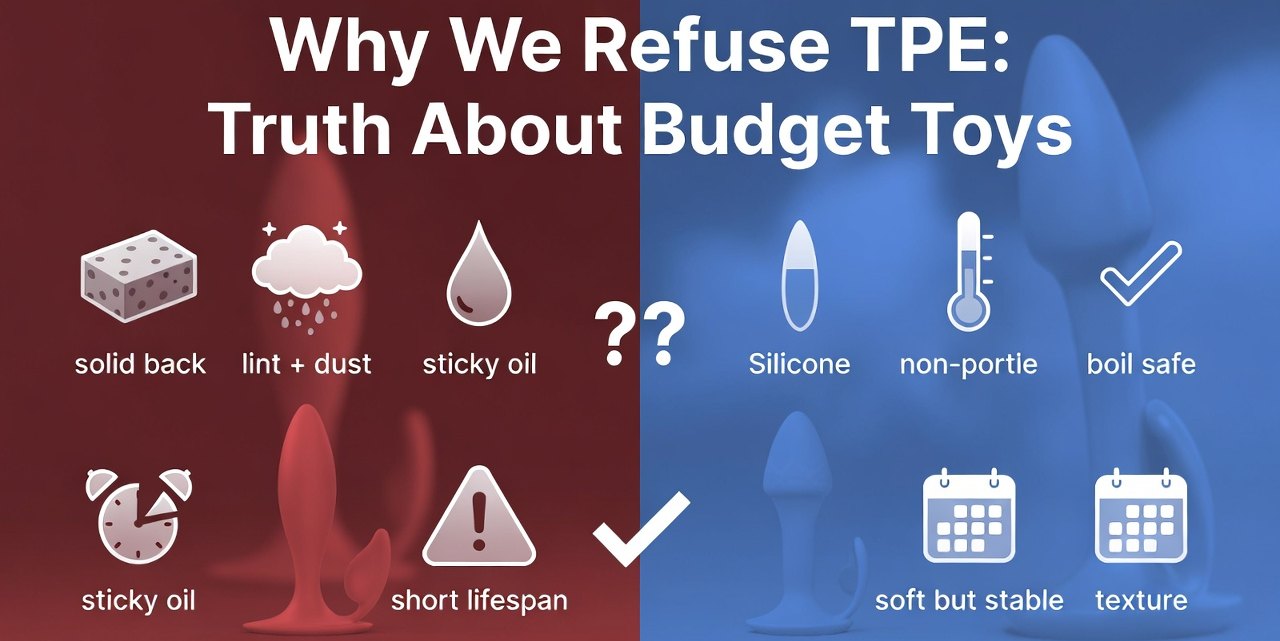
TPE is a nightmare material for this. It's porous, it's oil-permeable, and most sealants don't bond properly to it. I've tested probably 20 different approaches, and only two have worked consistently. see here, Why We Refuse TPE.
Real talk: if you're doing this for internal use, you should really just invest in a platinum-cure silicone toy instead. TPE is inherently porous and will harbor bacteria no matter how well you seal it. The painted/sealed TPE approach is okay for short-term experiments or external use, but for long sessions or regular use, you're risking your health.
How can I model asymmetrical veins for maximum realism instead of making everything too 'perfect'?
Asymmetry is where realism lives, but it has to be anatomically plausible asymmetry, not random chaos. I approach this by studying reference anatomy and understanding why veins are asymmetric.
In real anatomy, vein asymmetry comes from: handedness (right-handed people often have slightly more prominent right-side vascularity), circumcision (scar tissue affects vein routing), injury history, and just random genetic variation in vascular development. These create patterns—not randomness.
One warning: don't confuse "asymmetric" with "deformed." A 5mm left curve is realistic asymmetry. A 25mm curve is a medical condition. Keep your asymmetries subtle—1-3mm variations in position, 10-20% variations in prominence, 5-15° variations in angle.
Why do 3D scans of penises lose vein detail—how do I fix this without hand-sculpting every line?
The technical reason is that most 3D scanning technologies (structured light, photogrammetry, laser) have resolution limits around 0.1-0.3mm, and fine vein detail is often 0.2-0.5mm in depth with gradual edges. The scanning software's mesh reconstruction algorithms also smooth out high-frequency details because they assume those are noise.
Photogrammetry specifically struggles because it relies on identifying feature points across multiple photos. Veins are subtle, low-contrast features that don't create strong feature points. The software literally can't "see" them well enough to reconstruct them accurately.
Look, we've covered a lot of technical ground here, from geological principles to 3D modeling workflows to material science. The core message is this: realistic vein texture isn't about randomly adding bumps to a dildo. It's about understanding the structural principles that create those patterns in nature, then thoughtfully applying that knowledge to create something that feels authentic during use.
I've wasted enough silicone, ruined enough casts, and gotten enough friction burns testing this stuff that you don't have to. Whether you're replicating your partner's anatomy for long-distance intimacy, creating custom toys for your own preferences, or just experimenting with texture design, the principles here will save you time, materials, and disappointment.
The intersection of geological vein formation and human anatomy might seem like a weird tangent, but understanding how complex natural patterns form gives you the mental framework to recreate them convincingly. And at the end of the day, that's what separates a mediocre custom toy from one that makes you text your friend at 2am saying "holy shit, this actually works."
Article Editor: JockTribeRoger, Co-Founder & Lead Designer
Check out our comprehensive guide to dildo materials and stiffness;


